Scoroncocolo TechPages

 only search Scoroncocolo

Windows Hacks and Facts

Cool Software.

XP, Vista and Windows 7 tips and tweaks and lots of other geeky things for computer users

Blog Roll

LifeHacker


TechMeme


ReadWriteWeb


Online Tech Tips


How-To Geek


What's On My PC


Bill Mullins' Weblog - Tech Thoughts


evilfantasy's blog


AskBillFirst


Navigation

Home


Scoroncocolo's Intelligent Design


Goofing-off Page


The National Debt


The Beer Page


Me


Contact Me


Recent Posts

QR Codes


Turn Off Google Search Plus


Most popular Free Smartphone Apps


iPhone 4s Tips and Tricks


Voice-Activation on iPhone and Android Phones


A-Google-A-Day The Google Game


Websites Blocked In China


Google's New What Do You Love


Me On The Web and Google Alerts


The Les Paul Google Doodle


The Onion, Facebook and Literally Unbelievable.com


Zombie Alert!


Disk Defragmentation Is Automated with Vista and Windows 7


Don't Goolge Osama bin Laden


Amazon Cloud Drive Music Player


Internet Explorer 9


Google Profile


Black Hat SEO


Google Chrome 9


Mixtape.me


Use Your Keyboard and Not Your Mouse


Windows 7 Keyboard Shortcuts


Microsoft Office Web Apps Vs Google Docs


Google Docs


Google Dashboard


Google Web History


HTML5


Facebook Security


Firefox Add-On NoScript


Scareware


Google's Free Stuff


Dropbox - File Storage and Syncing


Cloud Computing with Gladinet and SkyDrive


How to Use Google Wave


Backing-up and Synching Files with SyncToy


Internet Browsing Inside a Sandbox


Computer Tips and Tricks


On-line Backup Strategies


StatCounter


Google PageRank


Long Tail SEO


What Is SEO - SEO DO's And Don'ts


Vista and XP Keyboard Shortcuts


What's the Best Web Browser


Windows NotePad


Big Brother Is Watching?


How to Create a Web Page - Part One


Windows Live Mesh


Vista's Flip3D and XP's WinFlip


Updating with Secunia and RadarSync


Live Sync


SkyDrive


What's Going On Behind Your Back


Vista Snipping Tool


Hide Files in JPEGs


Hide Files in Vista or XP


Input Director


February 15, 2012

Bookmark and Share
Scoroncocolo's Somethings To Think About -
       "Experience is that marvelous thing that allows us to recognize a mistake when we make it again."

Re-boot, Restore, Back-up iPhone

How To Re-boot Your iPhone

Re-boot or Restore and Back-up iPhone

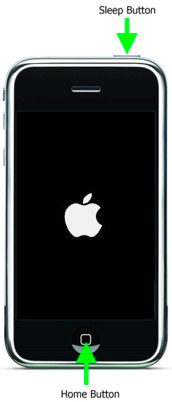
The White Apple Logo

Re-booting your iPhone or iPod is the first thing you want to do if your devise freezes up or one of your apps goes haywire. Recently, the compass on my iPhone got stuck or frozen at 0 degrees North. No matter what I did with the configurations within the app, the compass stayed stuck at zero degrees North until I hit on the idea of re-booting my iPhone and miraculously the compass began working again. So if you ever find yourself having trouble with an iPhone app or with the phone itself freezing up, re-booting the phone is the first thing you might want to try.

Re-booting or re-setting your iPhone or iPod is not to be confused with simply turning your phone off and then back on again. To turn an iPhone off, you simply push and hold the sleep/wake button on the top of the phone until you see the "slide to power off" bar. Once that bar appears you can slid it to turn off the phone or tap "Cancel" to keep the iPhone turned on. To turn the phone back on, push and hold the same button. But that's not the same as re-booting the phone.

Your iPhone is a computer no less than the one setting on your desk at home or at work and like any computer you can turn it off (put it into sleep-mode) or re-boot it. We all know that ever now and then computers need to be re-booted and so it is with our hand-held devices.

To re-boot (re-set) your iPhone do this: Make sure your phone has at least 50% battery charge before you push and hold the sleep/wake button and the Home button (the big button on the bottom of the iPhone) at the same time. You keep holding these two buttons down until the screen goes black. The red power-off slider may appear but keep on holding those two buttons until you see the white Apple logo. Now you can turn loose of those buttons because your phone is re-booting. It may take a while to happen but eventually the phone will come back on and hopefully whatever problems you were having will have been resolved. An iPhone re-boot (re-set) will not normally remove or delete any data or settings for the phone or settings for any installed apps.

Restoring an iPhone - The Nuclear Option


As I said before, re-booting your iPhone is not the same as simply turning it off and on. Nor should re-booting your iPhone be confused with Restoring your iPhone. Restoring an iPhone is the A-bomb or nuclear approach to problem solving. Restoring an iPhone will erase any and all information placed on the phone after it came out of the factory's box. That means all of the apps you placed on it will be gone after a Restore. Restoring the phone will erase all of your Contacts. All of the music and videos stored on your phone will be gone after a Restore.

If you had the foresight to back-up your files and information to iTunes or iCloud regaining all that info on your newly restored iPhone will be an option. I'll be talking about backing-up your iPhone further down this page. There may be times when restoring your phone is the only way to fix it but, re-booting should always be your first choice because that way you don't loose any information or files.

But if you want to go the A-bomb route and Restore your iPhone here's how to do that:

But remember! If you run into problems with your iPhone or iPod, try re-booting it before resorting to restoring it.

Back-up Your iPhone Using iCloud

Restore From iCloud Backup

Restore From iCloud Backup

As we talked about in the passages above, just turning your iPhone or other Device off and on or even re-booting (re-setting) it isn't likely to cause you to loose files, information and/or apps but if you ever have to go the nuclear option and restore your iPhone you're going to loose everything and you're going to wish that you had had the foresight to have backed up all of your precious music and photos at the very least. So, lets talk a little bit about how to back-up the stuff on your iPhone, iPad and/or iPod using Apple's iCloud.

First, you must set up an iCloud account if you don't already have one. Here's how to set up iCloud on your iPhone, iPod Touch or iPad if you don't already have that done.

Once you have iCloud set up, get on your iPhone and go to Settings > iCloud > Backup & Storage on your phone or other iOS device and enable iCloud Back-up. In order for iCloud back-up to work you must insure the iPhone is in these three states:

Retrieving Back-up from iCloud

Sign in to iCloud and choose Restore from a Backup in the Setup Assistant. Then choose “Restore from iCloud Backup” and enter your iCloud account and password. This is the email address associated with your Apple account and the password you use to download music and apps. You'll then see the three most recent back-up your phone or iDevice has made so choose the one you want.

Once the restoring process begins and iCloud begins downloading all of your music, videos, pics and apps to your phone, you maybe prompted from time to time to enter passwords for all the accounts you have enabled on your phone. So think of all the passwords you may need (Facebook, Twitter, etc.) and be sure to have those handy. Apps are downloaded last and a progress bar will appear under each app. You can prioritize the restoring of one app as apposed to all others by tapping on it.

Back-up Your iPhone Using iTunes

If you have iTunes installed on your PC or Mac and of course we all do, you can use iTunes to back-up your iPhone, iPod and iPad instead of iCloud.

Anytime you Sync your iPhone with iTunes it will automatically back-up your phone unless you're already using iCloud for your back-up and then it won't back your device up unless you Right-click (or Control-click on the Mac) your phone or other iDevice in iTunes under Devices and choose Back Up. If you decide to go with this manual method of backing up your iPhone on iTunes, you'll need to follow these steps.

Retrieving Back-up from iTunes

Pull up iTunes on the computer you used to make the back-ups with and dock your iPhone, iPad or iPod to that computer using the docking USB connector that came with your device. (You know of course, that your iPhone re-charger is also your iPhone docking deice.) Right-click (or Control-click) your iphone or other iDevice and choose Restore from Backup.

Thanks For Visiting the Scoroncocolo Tech Pages

Scoroncocolo

Steve Is the Geek at Scoroncocolo.com

Vague and Nebulous Computer Tips and TricksQuestions? Comments? Did I get something wrong? Email me at sjh@scoroncocolo.com and I WILL get back to you. Or better yet, leave a comment in the comment section below.

If you'll look at the left-hand side of the top of this page, you'll see list of all of the tech-related articles posted on Scoroncocolo.com.

If you would like to submit an article for publication on Scoroncocolo.com, send an email addressed to Steve at sjh@scoroncocolo.com. Please put the phrase "idea for post" somewhere in the subject line.

Monetary compensation for material submitted is negotiable.


blog comments powered by Disqus
About - Services - Portfolio - Contact Us - Home Page

Copyright © Scoroncocolo 2008 - 2012